Introduction
I have set up a personal cloud server at home using Nextcloud. This solves the problem of privacy and the data size I can save does not depend on how much I can pay each month. So far, I am very happy with this solution! Nextcloud is a great software and I really feel like I am the master of my own data.
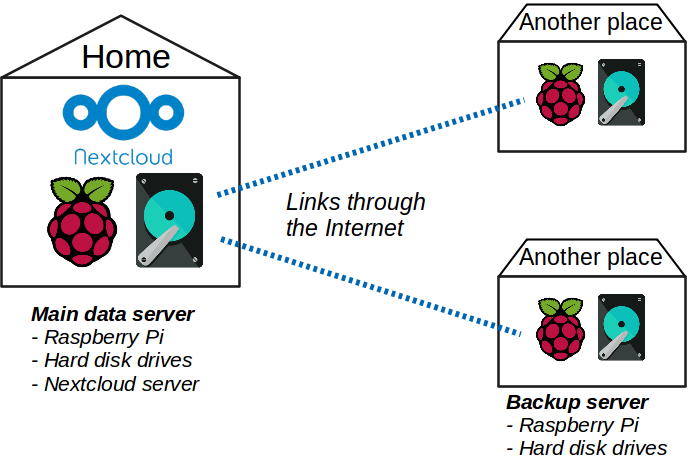
Now there is still one problem. What if my flat burns? Or get robbed? My nice setup is defenceless against this kind of threat, I would simply lose everything. Another threat is data corruption, either by a wrong user action or a malware (ransomwares are more and more common nowadays!). RAID can prevent losing data because from a faulty disk, but not from the previous reasons.
The obvious solution is to make backups in another place than my home. Or even several other places to maximize safety! And it is better to have the whole thing automated of course. The following figure illustrates the principle:
Several pre-conditions are required:
- having other places to store the backups.
- having a hardware to make backups. I found out that a Raspberry Pi does the job quite well for my Nextcloud server. However, as backups servers do not need to host Nextcloud and just regularly copy data to a hard drive, no need for the best one. As for the hard drives, I don’t want to spend a lot of money to haves disks in RAID like I did for the main server. They are just backups, a simple disk in the form of an external drive is enough.
- having a connection between the main server and the backup servers. All of them are connected to the Internet, and the main server is reachable from anywhere using SSH. So that’s it! Backup servers can connect to it using SSH thanks to their ssh keys.
Now that the problems of the physical world are solved, let’s solve the digital ones! In short, I am using rsync daemon mode over ssh.
Configurations
rsync is an ideal tool to perform backups of distant hosts. There are several ways to do so:
- With a password and directly over SSH. Secured but manual.
- With a public key and directly over SSH. Better for automation (if the key does not have a passphrase) but whoever has the private key of the backup server can mess with the main server. I am considering this possibility because my backup servers are away from me and I am not in full control, they can be stolen.
- Running rsync in daemon mode on the main server. It has nice options like read-only mode. But it opens a TCP port that has filesystem access and is hard to secure.
The solution I am choosing is a combination of the previous ones: using rsync daemon mode over SSH.
This mode is explained in the man page of rsync under USING RSYNC-DAEMON FEATURES VIA A REMOTE-SHELL CONNECTION.
Here are the steps to set this up.
Configure the rsync daemon
The basic use of rsync with a distant host is something like:
rsync host:source_dir dest_dirWhere source_dir is a path on the remote machine. But when rsync runs as a daemon on the distant host, it can manage modules which reference one or more paths with options, and the command line becomes:
rsync host::module_name dest_dirNote that there are two colons between the host name and the module name.
The description of the available modules can be done in a configuration file given as a parameter to the rsync command while starting the daemon:
rsync --daemon --config=rsyncd.confTo learn more about this configuration file, read man rsyncd.conf. Here is the configuration file of my daemon to backup files from Nextcloud:
# /home/backup-maker/.rsync/rsyncd.conf

log file = /home/backup-maker/.rsync/rsync.log
# to avoid a compromised backup server to harm the main server, it is ro
read only = true
exclude = lost+found/
# important to keep users and groups of files untouched
fake super = yes
# important or else it tries to chroot to path and fails because not root
use chroot = no

[nextcloud_data]
comment = Data files of the Nextcloud server; does not include the database.
path = /path/to/nextcloud/data
# exclude additionnal files that are not critical for users,
# to save space and time
exclude = files_trashbin/ uploads/ appdata_* updater-*

[nextcloud_db]
comment = Database dumps of the Nextcloud server.
path = /path/to/db/dumps
As you can see there are two modules described in this configuration. One is for to the data files of all users of Nextcloud. The other one is for to the database dumps ; to backup the database properly, both must be syncronized on the backup server. One could merge those two modules into one, but I prefer managing them separatly.
Configure the Linux user
I created a new user named backup-maker on the Nextcloud server. SSH connections to this user will only allow to run rsync (I will get to that point later).
useradd backup-makerThe rsync daemon is run by user backup-maker (because the SSH connection is made by him). Therefore this user needs read access to Nextcloud files to be able to copy them. To achieve this, I am using Access Control Lists. This way, I do not change default user and groups of Nextcloud files, but I am adding read rights for the user backup-maker. That means that even without the rsync.d option read only, write access is prevented: double security! It is important to set the default rights too, in order for new files to have the correct rights in the future.
setfacl --modify --recursive backup-maker:r /path/to/nextcloud/data
setfacl --default --modify --recursive backup-maker:r /path/to/nextcloud/data
# And do the same on DB dumps directory
Configure the SSH connection
Each backup server must have access to the main server using SSH. To do so, each backup server must have a SSH key pair, and give the public key to the main server so that it can connect to it without giving a password.
First, I need to generate a ssh key pair on the backup server:
ssh-keygen -t rsa -N "" -f ~/.ssh/id_rsa_nextcloudAnd copy the content of ~/.ssh/id_rsa_nextcloud.pub for the next step.
Note that I do not use a passphrase for this key (option -N), as I need it to be used automatically by a routine task, without a passphrase prompt. Because of it, the key-pair is stored in plain-text and therefore can be used directly if stolen. But our safeguard is to restrict the abilities of this key to the very minimum: read my data.
On the Nextcloud server, I add this public key to the list of authorized keys with a forced command. A forced command ensures that a command, and only this one, will be run when a given key is recognized. That ensures that the host connecting with this identity won’t be able to do anything else than this written command.
Therefore, I force the backup server to run a daemon of rsync when connecting, and disable a number of advance features, such as TCP and X11 forwarding.
# /home/backup-maker/.ssh/authorized_keys

# The following ssh key starts a rsync daemon when connecting, to perform backup
command="rsync --config=/home/backup-maker/.rsync/rsyncd.conf --server --daemon . ",no-agent-forwarding,no-port-forwarding,no-pty,no-user-rc,no-X11-forwarding ssh-rsa <pub key> <name>
Where of course <pub key> and <name> are to be replaced with the public key of the backup server and an arbitrary name.
One can see that the configuration file written above is given as an argument in the command. Note that the path to this file cannot contain ~, it is not interpreted. One must use a full path or an environment variable like $HOME.
Configure the mail client
It is useful for the backup server to send emails each time a synchronization is performed, it is the only way to known if everything is alright.
I am using mutt as mail client. A simple configuration file is required ($HOME/.muttrc):
set realname = "optional name"
set header_cache =~/.mutt/cache/headers
set certificate_file =~/.mutt/certificates
set message_cachedir =~/.mutt/cache/bodies
set copy = no
set smtp_url = "smtps://$EMAIL_ADDRESS@$MAIL_SERVER:465/"
set smtp_pass = "$SMTP_PASSWORD"
set from = "$EMAIL_ADDRESS"
Then, to send an email the following command could be used:
mutt -a "./attached_file" -s "Title" -- $DESTINATION_EMAIL < content.txtWarning: Do not use rsync -v option if logs are sent via email afterwards. Emails are not encrypted, and it would mean the list of files would be sent as clear text over the Internet. Use only rsync --stats instead.
Perform the backup
To actually perform the backup, the rsync command must be run on the backup server. One command per module:
rsync -a --stats --delete -e "ssh -i ~/.ssh/id_rsa_nextcloud -l backup-maker" backup-maker@main_server_address::nextcloud_data backup/nextcloud_data
rsync -a --stats --delete -e "ssh -i ~/.ssh/id_rsa_nextcloud -l backup-maker" backup-maker@main_server_address::nextcloud_db backup/nextcloud_db-aoption is used to preserve the ownership of the files.--statsprints a nice summary when the sync is over.-eto precise to use rsync over SSH with a given identity and SSH
user name.--deletetells rsync to delete files on destination if they have
been deleted on source.
Only client options can be given, as server options are already enforced by the SSH forced command.
Attention: there are two usernames used here — one for ssh and one for rsync (but they are the same here):
rsync -e "ssh -l ssh_username" rsync_username@host::module dest/I highlight the fact that the IP addresses of the backup servers can be unknown by the main server and they do not need to be static or even public. Only the main server has these requirements. Therefore, it is very easy to spread many backup servers anywhere as long as there is a simple internet connection.
Automation
On the main server
The database dumps must be made periodically. cron is well-suited in this case. The exact command depends on your database type and configuration. In my case, I run mysqldump once per week, creating a new dump file each time. Here is the cron line:
0 0 * * 7 root /path/to/make_db_backup.sh 2>&1 >> /var/log/nextcloud/db-backup.logAnd here is the script which manages the backup files:
#!/usr/bin/env bash
# make_db_backup.sh

# Enable maintenance mode
echo "Enabling maintenance mode"
nextcloud-occ maintenance:mode --on

# source DB secrets
echo "Sourcing DB secrets…"
export $(grep -v '^#' db.env | xargs)

# Make a new DB backup
backup_name=nextcloud-sqlbkp_`date +"%Y%m%d-%H%M"`.bak
echo "New backup $backup_name"
mysqldump --single-transaction -u$MYSQL_USER -p$MYSQL_PASSWORD $MYSQL_DATABASE' > /path/to/db/dumps/$backup_name
if [ $? != 0 ]; then
  echo "Backup failed!"
fi

# Disable maintenance mode
echo "Disabling maintenance mode"
nextcloud-occ maintenance:mode --off
A few notes:
nextcloud-occis not a native command, it is a personnal alias to run the nextcloud command occ.- The file
db.envcontains environment variablesMYSQL_USER,MYSQL_PASSWORD, andMYSQL_DATABASE. mysqldumpmay be run differently or with other options. It is just an example.
On the backup servers
What I want is to run the commands written above periodically, like once a week for instance. cron is once again perfect for the job.
First, user must not be in /etc/cron.deny and must be in /etc/cron.allow.
Then, cron configuration must be edited with the command crontab -e. I am creating a job that will run a custom script every Monday at 1 A.M.
00 01 * * mon username do_cloud_backup.sh >> backup_cron.logThe script do_cloud_backup.sh contains the rsync commands, as well as some others to build and send an email with a summary. Note that I am adding useful information to the email like disk usage and health (using smartctl).
#!/usr/bin/bash

# Initialize variables and files
rm -f /tmp/backup.log
rm -f /tmp/smart.log
rm -f /tmp/mailcontent
error=false

# Perform synchronization
echo -e "\n# rsync nextcloud data" >> /tmp/backup.log
rsync \
  -a --stats --delete \
  -e "ssh -i ~/.ssh/id_rsa_nextcloud -l backup-maker" \
  backup-maker@main_server_address::nextcloud_data \
  backup/nextcloud-data \
  2>&1 >> /tmp/backup.log \
  || error=true

echo -e "\n# rsync nextcloud DB" >> /tmp/backup.log
rsync \
  -a --stats --delete \
  -e "ssh -i ~/.ssh/id_rsa_nextcloud -l backup-maker" \
  backup-maker@main_server_address::nextcloud_db \
  backup/nextcloud-db \
  2>&1 >> /tmp/backup.log \
  || error=true

# Build email content
echo "Uptime: $(uptime -p)" >> /tmp/mailcontent
disk_usage=$(df -h | grep backup | awk '{print $5}')
echo "Disk usage: $disk_usage" >> /tmp/mailcontent
# note: /dev/sda must be replaced with the correct name of the the backup disk
sudo smartctl -H /dev/sda | grep overall-health >> /tmp/mailcontent
sudo smartctl -A -f brief /dev/sda | tail --lines=+3 >> /tmp/smart.log
echo "" >> /tmp/mailcontent
cat /tmp/backup.log >> /tmp/mailcontent
if [ error == true ]; then
  title="⚠️  ERRORED Nextcloud backup"
else
  title="✅ SUCCESSFUL Nextcloud backup"
fi

# Send email
mutt -s "$title" -a /tmp/smart.log -- $email_dst < /tmp/mailcontent

# Clean
rm -f /tmp/backup.log
rm -f /tmp/smart.log
rm -f /tmp/mailcontent
In case of…
Ransomwares
In case my data becomes encrypted on the main server because of such a malware, my backup server would copy these encrypted files and I would lose my data anyway! I am not an expert and I don’t know the best solutions to prevent this effect, but I have a very simple idea. I could write a dummy text file with a known content in the data directory of the main server. Then, I add a check of this file in the bash script of the cron job, before running the rsync commands. I could for instance create a new rsync module that copies only this dummy file. If this file has a correct content I can assume that the rest of my data has not been corrupted, and synchronize the other modules.
Stealing of the backup SSH key
If someone can compromise one of my backup servers:
- He can access my backuped data. But it cannot have any impact on the original data on the main server.
- He has the private key. Again, as the connection is limited, he can only read data on the main server. But another threat is DDOS, bandwidth flooding, by repeatedly executing the backup command. To counter that, I set a safeguard on the main server to prevent this kind of behaviour by limiting the connection rate. I also use fail2ban.
If one does not want his data to be read at all, the solution is to make NextCloud encrypt all data in the first place.
Loss of the backup server
No need to worry, my main server is still on tracks and I did not lose anything. I just need to replace/fix the broken/stolen/burnt backup server with a new one.
If I am worried about the SSH key being in the hands of an evil person, I can simply remove this key from the list of authorized keys on the main server, and this key becomes useless.
Loss of the main server
That is more annoying, but backup servers are there for it! I must bring back the hardware in place for the main server, then I use rsync on the other way to restore data. It is a bit more complex for the database but nothing extraordinary. A fresh installation of Nextcloud can use all that as nothing ever happened.
Addition of a new backup server
I can multiply the number of backup servers simply by adding each new public key to the list of authorized keys on the main server. There can’t be any conflict between them, and each new backup will be an additional safe copy.
Other References
Some interesting links, not already listed in this article:
- The rsync man page.
- A nice Gist: trendels/rsync_daemon_over_ssh.md.
- This StackExchange question.
Laisser un commentaire